Table of Contents
ToggleMixing tile and wood flooring in one home isn’t a design compromise, it’s a strategic move that brings durability, style, and function together. Wood feels warm and inviting underfoot, while tile excels in moisture-prone zones like kitchens and bathrooms. The real challenge isn’t picking one or the other: it’s making them work side by side without jarring visual breaks or sloppy edges. With the right transition methods and a solid game plan, you can create a cohesive look that flows from room to room. This guide walks you through the most practical and visually appealing ways to blend these two flooring types, so your home feels intentional rather than patched together.
Key Takeaways
- Tile and wood flooring combinations strategically pair moisture-resistant tile in kitchens and bathrooms with warm wood in living spaces, maximizing durability and comfort while extending your material budget.
- Transition strips—available in metal, wood, or vinyl—bridge the height gap and visual boundary between flooring types; choose profiles that match your décor style and measure the exact height difference before ordering.
- Diagonal layouts and wood-look tile blend flooring types seamlessly by creating visual flow rather than harsh lines, making the transition feel intentionally designed rather than compartmentalized.
- Color coordination and grout selection are critical: match warm wood tones with warm tile colors and choose grout shades that complement rather than clash with your flooring materials.
- Install tile first with proper curing time (48–72 hours), acclimate hardwood for 5–7 days, then install transitions last to prevent moisture damage and ensure a smooth, gap-free result.
- Maintain wood with regular dry sweeping and damp mopping while sealing grout and caulk joints every 2–3 years to protect against water damage and debris accumulation at transition points.
Why Mix Tile and Wood Flooring in Your Home
The decision to combine tile and wood flooring makes sense from both practical and aesthetic angles. Tile dominates in bathrooms, kitchens, and entryways because it resists moisture, stains, and heavy foot traffic without warping or swelling. Wood brings warmth and acoustic comfort to living rooms, bedrooms, and dining areas, spaces where durability to water damage isn’t the primary concern.
Many homeowners also choose this mix to extend material budgets. High-quality hardwood throughout an entire home gets expensive, so running it in primary living zones while using durable tile in utility areas gives you luxury where guests see it most. You’re also safeguarding against one of hardwood’s biggest enemies: humidity and spills. A bedroom floor won’t take daily bathroom moisture, but a kitchen island surely will.
Design-wise, layering these materials lets you define zones. A tile entry foyer can announce formality and easy cleaning, while wood in an adjacent living room invites comfort and relaxation. This visual and tactile variety keeps a home from feeling monotonous, as long as the transition between them reads clearly rather than chaotic.
Popular Transition Methods Between Tile and Wood
Threshold Strips and Trim Solutions
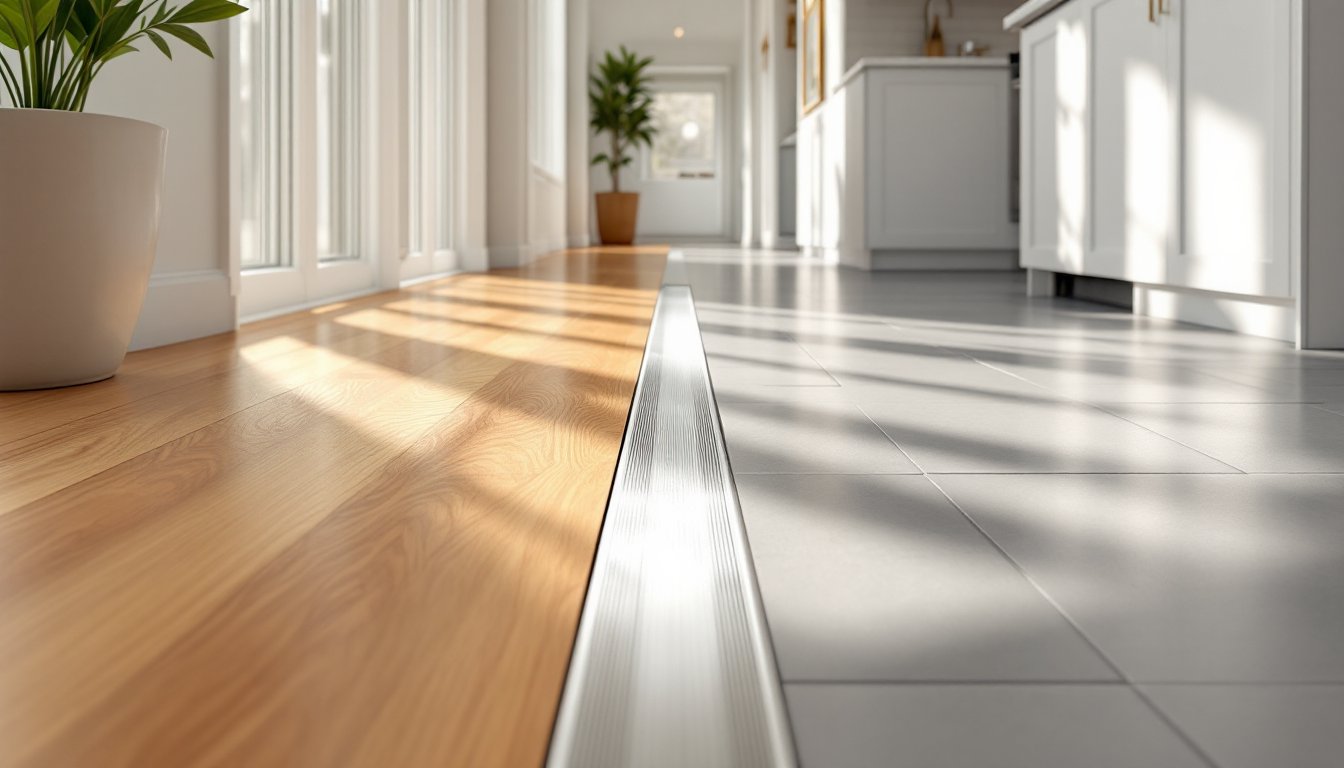
The simplest and most common fix is a transition strip (also called a threshold or reducer), a narrow trim piece that bridges the height gap and visual boundary between two flooring materials. Most tile sits slightly higher than wood due to underlayment, grout, and the tile itself, so this piece does real work beyond aesthetics.
Metal transitions (aluminum or brass) are durable and modern, especially in contemporary or minimalist homes. They screw down to both surfaces and hide uneven edges. Wood transitions match hardwood flooring and feel seamless in traditional or warm interiors, sand and stain them to match your planks. Vinyl or rubber reducers are budget-friendly and work well in casual spaces, though they wear visibly over time with foot traffic.
The key is choosing a profile that suits your ceiling height and décor style. A tall, ornate wood trim announces itself in a Victorian farmhouse: a sleek aluminum bar nearly disappears in a modern loft. Also measure the exact height difference between your finished floors before ordering, nominal thicknesses vary wildly.
Installation is straightforward: scribe the piece to fit any uneven subfloor, secure it with construction adhesive and finish screws (use stainless steel to avoid rust stains on light tile), and caulk any gaps. Do this work after both floors are installed, or you’ll end up cutting transitions twice.
Diagonal and Mixed-Pattern Layouts
If you’re open to creative floor planning, running tile and wood at different angles can blur the boundary between them. A diagonal tile pattern leading into straight-grain wood, for example, creates visual flow rather than a hard line. This approach demands careful layout and is trickier to execute, but the payoff is a home that feels intentionally designed rather than compartmentalized.
Another option is blending wood-look tile with actual wood in the same room. Modern wood-look porcelain tiles are nearly indistinguishable from hardwood at first glance, so you can run tile in a high-moisture strip (like under an island sink) and real wood everywhere else, and the eye reads it as one material family. This is especially useful in open kitchens where moisture creep happens near prep zones.
Mixed patterns also work: imagine a subway tile backsplash in a kitchen, then wood on the floor, then a diagonal tile pattern in a mud room just beyond. The shifts feel intentional because each zone has its own visual logic. This requires more planning but avoids the “awkward border” feeling of a simple threshold.
Design Tips for Seamless Visual Flow
Color coordination is your first lever. If your wood is warm honey-tone, choose tile in warm grays or cream rather than cool blue-grays: the shift will feel jarring otherwise. Conversely, if you love contrast, lean into it deliberately, a dark walnut floor paired with crisp white subway tile reads as intentional. Muddled middle tones (tan wood with beige tile) tend to look accidental and dated.
Align grout color carefully, too. Dark grout makes tile feel heavier and grounded: light grout keeps it airy. If your wood is dark, a light grout can actually tie the two materials together by echoing the wood’s lightness rather than competing with it. Remodelista’s curated design sourcebooks offer plenty of real-world examples of successful color pairing.
Consider the visual weight of each material in the room. Large tiles feel modern and open: small mosaic tiles feel busy. If you’re pairing bold tile with subtle wood, size them proportionally, don’t use oversized tile and delicate narrow planks: they’ll feel unbalanced. Similarly, matte finishes pair well together, while mixing high-gloss and matte creates tension (sometimes good, sometimes distracting).
Layout direction matters more than you’d think. If your wood planks run lengthwise down a hallway, consider running tile in the perpendicular direction just beyond the threshold, it signals a room change without a hard visual break. Open-concept layouts benefit from subtle shifts like this.
Finally, don’t neglect the subfloor. Both tile and wood need a stable, level substrate. Wood especially can’t tolerate cupping or bouncing, and tile will crack over a flexing subfloor. Spend time on prep before worrying about fancy transition geometry.
Installation and Maintenance Considerations
Installation order matters. Lay tile first (including curing time, typically 48–72 hours), then wood. This prevents moisture from the tile’s wet setting materials migrating into hardwood. If the job reverses, wood can swell and buckle before tile ever goes down.
Acclimate your hardwood to the home’s humidity level for 5–7 days before installation. Wood moves with moisture in the air: if you skip this step, your planks will shift and gap weeks after install, ruining that smooth transition. Tile doesn’t have this problem, which is one reason it dominates kitchens, but don’t let that lull you into skipping prep.
Threshold installation happens after both floors cure. Use construction adhesive rated for the materials (some adhesives don’t bond well to sealed wood or glazed tile). Screw from underneath if possible to hide fasteners, or use stainless steel screws driven from the top and filled with matching stain or grout. This Old House’s home renovation tutorials cover fastening techniques in detail.
Maintenance differs sharply. Wood needs regular sweeping and occasional damp mopping: standing water is its enemy. Tile handles wet mopping easily but grout can stain without sealing (especially in light colors). The transition strip itself is a dust trap, so vacuum the seam monthly to keep it from becoming a visible line of grime.
Sealant matters too. Caulk the joint between transition and both flooring types with flexible, paintable caulk rated for high-traffic areas. This prevents debris from settling beneath and protects against water wicking into the wood. Reseal every 2–3 years in wet zones. ImproveNet’s renovation cost guides include realistic timelines for these upkeep tasks across different flooring types.
Conclusion
Combining tile and wood flooring works beautifully when you treat the transition as a design feature, not a problem to hide. Invest in quality trim, coordinate colors deliberately, and never rush the installation sequence. Your home will feel more intentional, functional, and visually cohesive, and you’ll get the best of both materials where they belong.