Table of Contents
ToggleMixing tile and wood flooring sounds like a risky move, but when done right, it transforms your home with visual interest, practical durability, and genuine sophistication. Rather than committing to one material throughout, a mixed-floor approach lets you leverage the strengths of each: tile’s water-resistance and easy maintenance where spills happen, plus wood’s warmth and organic appeal in living spaces. The 2026 design trend leans into this hybrid strategy, especially in open-concept homes where different zones need different functionality. Homeowners are ditching the “all one material” rule and embracing strategic combinations that work harder and look sharper than either flooring alone.
Key Takeaways
- Tile and wood flooring combination ideas offer practical durability by using tile in moisture-prone areas like kitchens and bathrooms while wood adds warmth and sophistication to living spaces.
- The border-and-field approach and herringbone layouts are effective design patterns for mixed flooring, with borders hiding seasonal expansion gaps and angled patterns creating intentional visual contrast.
- Pair light woods with cooler tiles and darker woods with warmer tiles, using larger format tiles (12×24 or larger) next to plank flooring for visual balance and a cohesive look.
- Proper subfloor leveling (within 1/8 inch per 10 feet), wood acclimation of 7–14 days, and transition profiles are critical installation steps that prevent gaps, cupping, and safety hazards.
- Install tile first and let grout cure for 48 hours before installing wood at least 12 inches away, then seal both wood and grout lines to protect your mixed-floor investment long-term.
Why Mix Tile and Wood Floors
The primary reason to combine tile and wood is practical: kitchens, bathrooms, and entryways face moisture, spills, and foot traffic that wood struggles with alone. Tile excels in these zones, it’s non-porous, won’t swell or stain from water, and resists grout lines. Wood, meanwhile, offers thermal warmth, acoustic benefits (less echo than hard tile), and a cosier feel in bedrooms and living rooms.
Design-wise, the contrast creates visual drama. A wide plank oak or walnut floor can frame areas with sleek porcelain or natural stone tile, establishing clear zones in an open floor plan without building walls. The tonal interplay, say, warm wood against cool gray tile, adds intentional sophistication that feels more curated than one monotone material.
There’s also the durability angle. Wood flooring in a kitchen alone will warp and stain over time: mixing materials lets you use wood where it thrives and tile where it’s essential. This extends the life of both and reduces replacement costs down the road.
Design Patterns for Mixed Flooring
Layout matters as much as material choice. The pattern you choose determines how visually unified or deliberately segmented your space feels.
The Border-and-Field Approach
This is the safest entry point for mixed flooring. Wood dominates the field (the main floor area), while tile forms an inlay border around the perimeter or along a kitchen island. A 3- to 6-inch wood frame with a tile accent stripe inside defines zones without jarring transitions.
Practically, this approach also hides gaps. Flooring naturally expands and contracts with humidity: a tile border acts as a buffer zone, allowing wood to move without meeting drywall or cabinetry. Leave at least a 1/4-inch gap between materials to accommodate seasonal movement, then cover it with a matching trim piece or transition profile.
Diagonal and Herringbone Layouts
For a more dynamic look, run wood in herringbone or diagonal patterns while anchoring tile in distinct zones, under a kitchen island or in a bathroom doorway. This demands more layout planning. Mark the center point of the room, snap chalk lines, and dry-lay both materials before fastening anything. Herringbone is unforgiving: miscalculate the starting point and you’ll end tiny slivers at walls.
Tile in these layouts typically runs straight on a grid, emphasizing the contrast with the angled wood. This intentional pattern clash reads as deliberate design, not accident. Consider using a comprehensive home improvement resource to visualize your layout before committing to material orders.
Room-by-Room Application Guide
Different rooms demand different strategies.
Kitchen: Tile the cooking and prep zone (island, range backsplash perimeter, and sink alcove) where splatters and spills are inevitable. Wood works beautifully in dining nooks and adjacent living areas. The transition usually runs perpendicular to cabinetry, creating a natural visual break.
Bathroom: All-tile is traditional for a reason, humidity is unrelenting. But a powder room with no shower can safely use wood in adjacent areas (hallways, bedrooms). Never run wood directly under a sink or tub: the subfloor will soak moisture from pipe sweats and leaks.
Entryway and Mudroom: Tile at the threshold handles wet boots, snow melt, and tracked dirt. Wood behind the tile keeps the main living space warm and inviting. This combo is practical and visually addresses the messy-to-clean transition cleanly.
Living Room and Bedrooms: Hardwood here feels right. If the main floor is mostly wood with tile only in the kitchen and bath, these spaces maintain continuity. Use wood flooring throughout to tie the home together, reserving tile strictly for wet zones.
Design sourcebooks like Remodelista showcase examples of how top designers handle kitchen-to-living room transitions, worth studying before your own layout.
Material Selection and Color Coordination
Not all wood and tile pair equally. Here’s what to consider:
Wood Species and Tone:
Light woods (white oak, ash) work well with cooler tiles (gray, blue, white porcelain). Darker woods (walnut, hickory) pair naturally with warmer tiles (cream, terra cotta, warm gray). Engineered hardwood is acceptable for kitchens if the core is plywood (adds moisture resistance), but solid hardwood belongs in drier zones only.
Tile Material and Finish:
Porcelain tile is denser and less porous than ceramic: it outperforms in kitchens. Natural stone (slate, limestone) is beautiful but high-maintenance, it stains, needs sealing, and is costlier. Glazed ceramic works for low-traffic bathrooms and entryways. For kitchens, opt for matte or textured finishes (slippery glazed tile is a safety hazard near sinks).
Tile Size Matters:
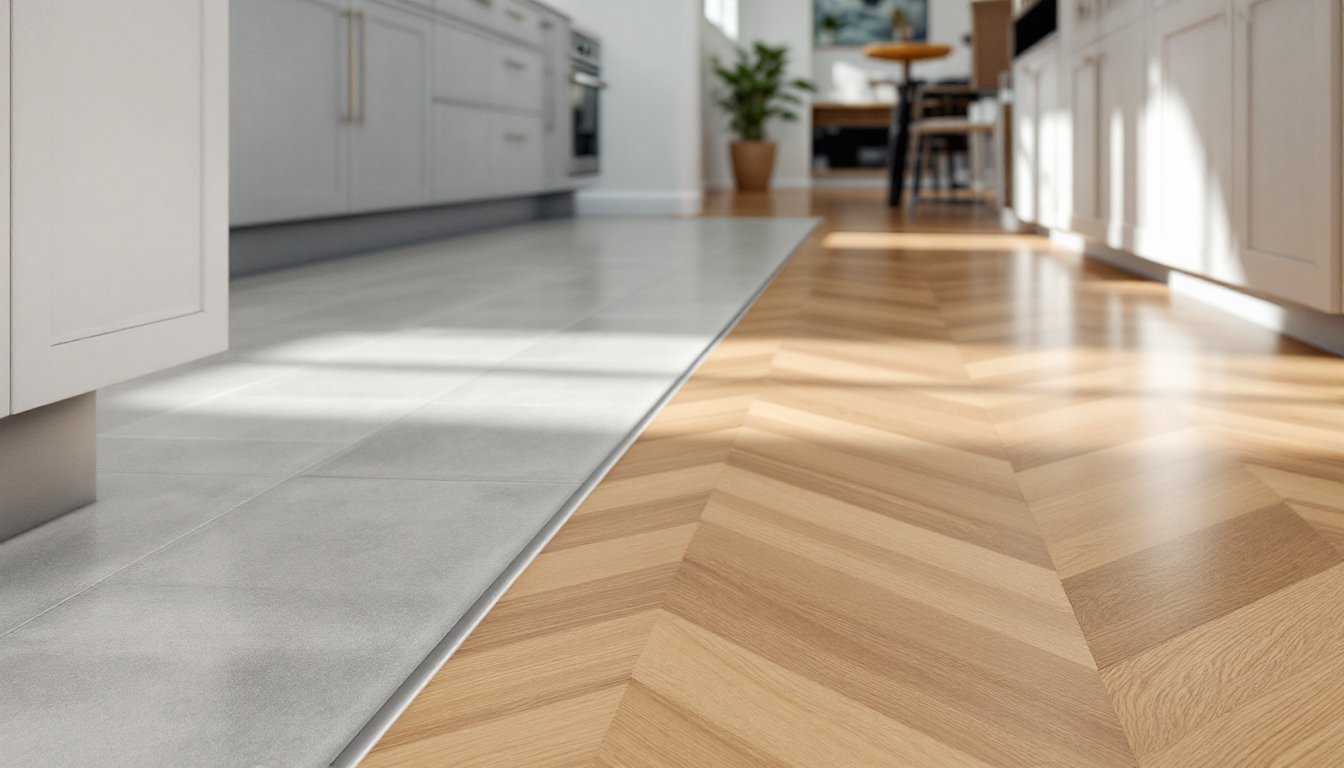
Small tiles (4×4, 6×6) feel busy and visually fragment wood. Larger format tiles (12×24, 18×36) read cleaner and feel more intentional next to plank flooring. Match tile size roughly to wood plank width for visual balance, wide planks paired with large tiles, narrower planks with smaller tiles.
Color Continuity:
Pull accent colors from existing cabinetry and counters. If your island is walnut, use walnut flooring nearby and select tiles that echo counter colors. Avoid stark contrasts unless deliberately aiming for bold visual separation. A neutral palette (warm grays, taupes, warm whites) is forgiving and timeless.
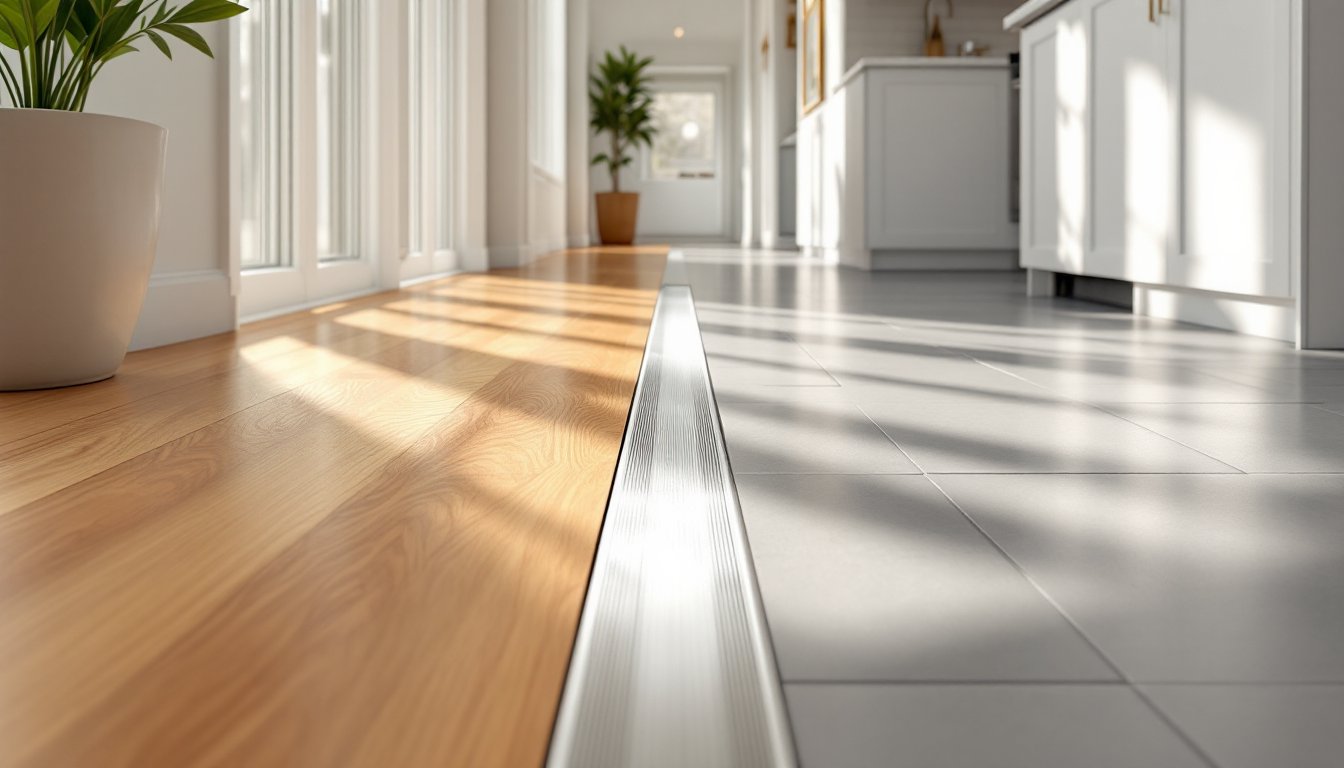
Installation Tips and Transition Strategies
Installation is where most mixed-floor projects stumble. The junction between tile and wood is critical.
Subfloor Prep:
Both materials require a level, clean subfloor. Use a long straightedge (6 feet minimum) to check for dips or humps. Acceptable variance is 1/8 inch per 10 feet. Any higher, and transitions will be visibly off or create a tripping hazard. Grind down high spots and fill gaps with self-leveling compound.
Acclimation:
Wood flooring must sit in the room for 7–14 days before installation, allowing it to adjust to local humidity. Tile doesn’t require acclimation, but skipping wood acclimation is the #1 cause of gaps and cupping later. Close windows, use HVAC to match intended conditions, and you’re set.
Transition Profiles:
Never butt wood directly against tile, use a transition profile (a metal or wood trim piece). T-moldings work where materials are at the same height: reducers slope one material lower. Quarter-round hides gaps but collects dust: modern profiles are sleeker. Match the wood tone or use brushed metal. This isn’t cosmetic, it prevents edge damage and creates a professional appearance.
Installation Order:
Install tile first using thin-set mortar (modified for the tile type) and latex-fortified grout. Let grout cure fully (48 hours minimum, per the manufacturer). Then install wood starting at least 12 inches away from the tile edge, nailing to joists only, never to the subfloor directly. This allows wood movement without binding against tile.
Sealing and Protection:
Wood flooring near tile edges should be sealed with a quality polyurethane (matte, satin, or gloss per your preference). Tile grout lines also need sealing with a penetrating sealer after cure to prevent staining. Reseal grout annually in high-traffic areas.
For detailed project planning and cost breakdowns, ImproveNet’s renovation guides provide state-by-state cost data and contractor vetting, useful if you’re hiring labor for the subfloor or tile work.